Introduction
This is the first part of a 3-chapter tutorial about how you could capture text from images taken by a MAUI application running on a mobile device: OCR by Mobile Client and Azure Backend. The suggested solution will have two main components: a REST API backend running in the cloud as an Azure Web Application and an MAUI client running on a mobile device. In this tutorial, I’ll use the Android Emulator for development purposes, but the client app can easily be ported to IOS and other platforms. Separating the actual engine into a backend component running in the cloud gives us the benefit that most of the code will run in a native .Net7 environment in the cloud, and they will not be restricted by any special requirement raised by the client operating system.
Prerequisites
I’m using Visual Studio 2022 on my developer machine. As its Community Edition can be a proper IDE, we would not utilize any features of the more expensive editions.
We also will use the Azure Storage Emulator. You could install it on your developer machine by following the excellent article here: Use the Azure Storage Emulator for development at learn.microsoft.com
I assume you are an experienced C# developer, familiar with the concept of REST API, and have already created mobile applications. To publish your backend API, you will need an Azure subscription. We will test the API through Postman, so you should download and install it on your developer machine. You can find a comprehensive description of installing and using Postman on the CircleCi Blog.
How the tutorial is structured?

The entire tutorial consists of three parts:
- Uploading binary content to a .Net Core REST API
We will create the initial version of the backend API here and develop an endpoint for uploading binary content (images) into the cloud. Because binary content can be specified in multiple ways – binary stream, raw Base-64 encoded text, compressed, uncompressed, etc. – so I’ll also teach you an excellent technique to hide the specification details from the endpoints and allow them to accept uncompressed byte arrays without knowing anything about the original representation. - Persisting images in an Azure Blob Storage and sending them to the Azure Computer Vision API
We will still focus on the backend API. I’ll show you how your Azure environment should be prepared and how the local development environment should be set up for creating, consuming, and testing Azure Services on your developer machine (esp. Azure Storage Emulator).
I’ll also show you how to set up your Computer Vision API access in your Azure account. We will see that even though the Computer Vision API is not a free service, you can still set up an Azure Service Plan that ensures practically free access for developers. - Dealing with cameras in MAUI applications
In the last part, we would turn to the client application, especially camera handling. I will show you how the MAUI framework supports creating mobile applications as quickly as possible, but I will also point out some bugs in the framework and show solutions to how you could deal with them.
So let’s get down to it!
Creating a simple REST API
Let’s create a new project. Since I prefer the MediatR pattern to the traditional MVC approach, I have a custom template to do this:
> dotnet new mediatorapi -o OCR.DemoYou can also download this startup project from my GitHub repository at https://github.com/Gwergilius/Mediator.Api.Template/tree/v1.0.0 (You can find an article focusing on the Mediator pattern here in the blog: How to implement Mediator pattern in an ASP.NET Web API)
Clean the initial project
Remove all the controllers, requests, request handlers, and services from the project (but we will need the folders, so preserve them). The WeatherForecast.cs model class shall also be dropped.
Finally, the initialization of the WeatherForecastService shall also be removed from the end of the ConfigureServices method in the Startup.cs class:
Startup.cs (fragment):
    public void ConfigureServices(IServiceCollection services)
	{
        services.AddControllers();
        services.AddEndpointsApiExplorer();
        services.AddSwaggerGen();

        services.AddMediatR(typeof(Startup));
    }
The using statement referencing the Services namespace shall also be removed from the very beginning of the Startup.cs file.
Create an UploadImage request
First, we should create an UploadImage request in the Requests folder to provide an entry point for uploading a binary image to the backend. The request will receive a byte array containing the binary data representing the image and returns a unique identifier — e.g., a GUID — for that image in the subsequent calls.
Requests/UploadImageRequest.cs
using MediatR;

namespace OCR.Demo.API.Requests;

public class UploadImageRequest : IRequest<string>
{
    public UploadImageRequest(byte[] image)
    {
        Image = image;
    }

    public byte[] Image { get; }
}
We also add a straightforward implementation for simply returning a new GUID.
RequestHandlers/UploadImageHandler.cs
using MediatR;

namespace OCR.Demo.API.RequestHandlers;
using Requests;

public class UploadImageHandler : IRequestHandler<UploadImageRequest, string>
{
    public Task<string> Handle(
        UploadImageRequest request,
        CancellationToken cancellationToken)
    {
        var id = Guid.NewGuid().ToString();
        return Task.FromResult(id);
    }
}
We will add more intelligent business logic to the handler later, but for now even this naive implementation is enough.
How should the controller be formed?
Yes, this is the million-dollar question.
To deal with images, we must create a new controller in the Controllers folder — i.e., ImageControllers.cs — with an endpoint to POST images to the API. The obvious idea is to receive the image data as a byte array sent in the request’s body, so our first implementation could be the next:
Controllers/ImageController.cs
using MediatR;
using Microsoft.AspNetCore.Http;
using Microsoft.AspNetCore.Mvc;

namespace OCR.Demo.API.Controllers;
using Requests;

[Route("api/images")]
[ApiController]
public class ImageController : ControllerBase
{
    private readonly IMediator _mediator;

    public ImageController(IMediator mediator)
    {
        _mediator = mediator;
    }

    [HttpPost]
    public async Task<IActionResult> UploadImage(byte[] image)
    {
        var imageId = await _mediator.Send(new UploadImageRequest(image));
        return Ok(imageId);
    }
}
Yes, I know that a POST request should return a 201 Created status code instead of 200 Ok. However, we can only provide the appropriate URL in the response’s Location header if we already have an endpoint for querying the uploaded images. So, for now, we prefer to return the OK answer.
Let’s build and run the code and see on the Swagger UI what an API interface is generated:
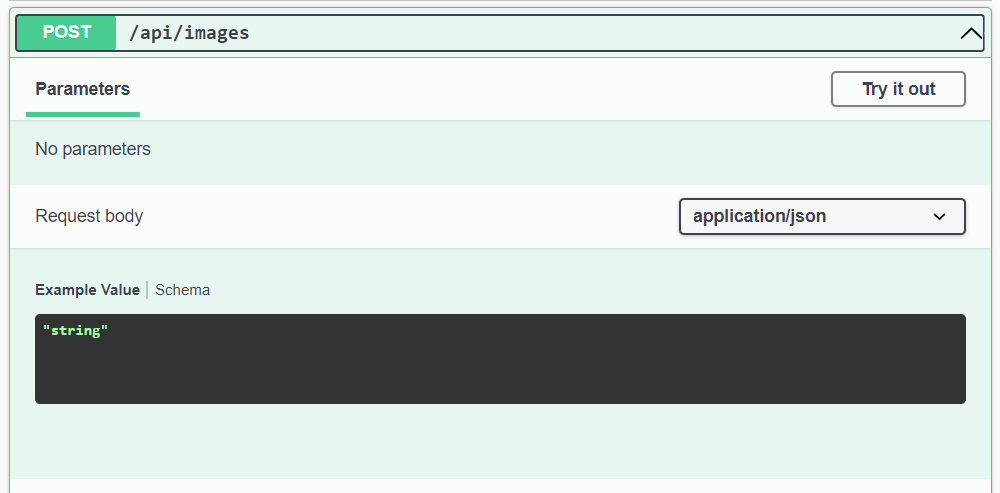
Interesting.
What shall the request body look like? A JSON structure (based on the MIME type), or an arbitrary string (suggested by the example data)? If the later, how can a string specify binary data? Should it be a Base-64 encoded string? Very confusing.
Test the API by Postman
Let’s test the API through Postman, which has more advanced features than the Swagger UI can provide. Please create a new POST request in it. (You can steal the port number from your Console Window popping up when you start the API or from your browser’s address line).
You can start the API from your Visual Studio IDE and send the Postman request when the API is running. We will get the 415 (Unsupported Media Type) error back.
Providing a Base64-encoded data — e.g., ‘SGVsbG8gV29ybGQh‘ instead of ‘Hello World!‘ — will not help. The API still refuses us by returning a 415 status.
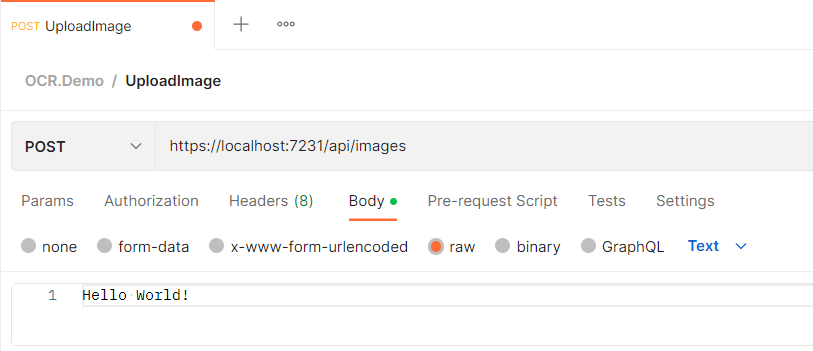
OK. Then let’s make try sending actual binary data by Postman. I have provided a folder called Sample.Data besides the source code with a HelloWorld.txt file in it. Turn the request body to binary content — a Select File button will appear in the body — and select our HelloWorld.txt file to be sent. Sending the request will still return a 415 status code.
Providing an explicit Content-Type request header with the value of application/octet-stream doesn’t help either. The API also rejects this by returning a 415 status code.
Marking the image parameter with a [FromBody] attribute will also not solve the issue.
How can you properly get a byte array, then?
After long search by Google, I have finally found a working clue:
You should read the data directly from the request body instead of passing them to the controller method. So the parameter list of the controller method shall be empty.
According to this, the controller method should look something like this:
Controllers/ImageController.cs (fragment)
[HttpPost]
public async Task<IActionResult> UploadImage()
{
    byte[] image = await ReadBinaryRequest(this.Request);
    var imageId = await _mediator.Send(new UploadImageRequest(image));
    return Ok(imageId);
}

private static async Task<byte[]> ReadBinaryRequest(HttpRequest request)
{
    var memory = new MemoryStream();
    await request.Body.CopyToAsync(memory);
    return memory.ToArray();
}
Be aware that you cannot use seek operation on the request body and that the body can only be handled by asynchronous operations.
And the result is promising:
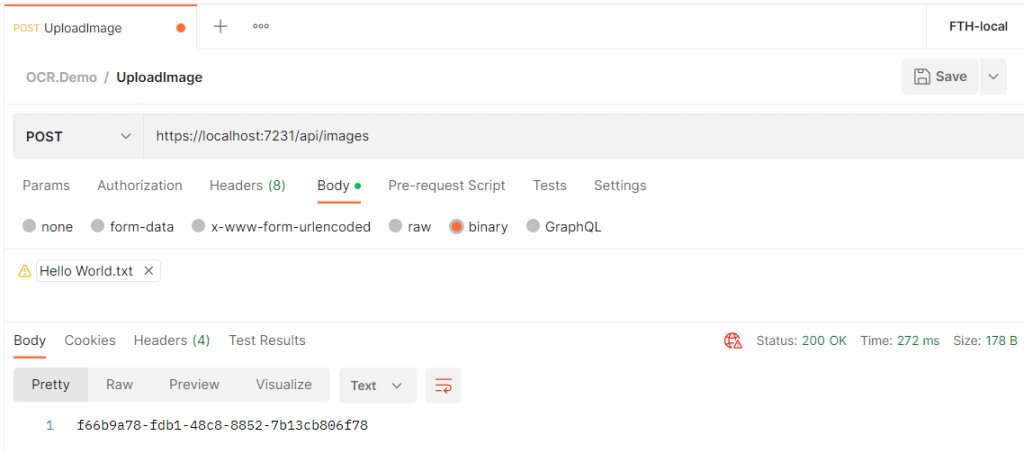
If you place a breakpoint into the controller before the mediator request is sent, you can inspect the data received. You will see that the image variable contains the raw bytes of the file we uploaded.
Improving our endpoints
Although the approach outlined above is working, we cannot sit back. My biggest problem with this solution is that the API description generated by Swagger (badly) states the UploadImage endpoint should not receive any parameter. It’s false and could raise problems if we automatically generate our API documentation from the swagger.json file generated from our source code. We would instead use the first signature for our endpoint (when the method accepts a byte array parameter) while reading the request’s body directly.
Does it seem like a contradiction? Yes, it does. However, the InputFormatter instances can resolve it.
(Thanks to Rick Strahl for his excellent article about this topic)
Creating an InputFormatter for presenting the request body as a byte array
ASP.NET Core has a clean and more generic way to handle custom formatting of content using an InputFormatter. Input formatters hook into the request processing pipeline and let you look at specific types of content to determine if you want to handle it. You can then read the request body and perform custom deserialization on the inbound content.
There are a couple of requirements for an InputFormatter:
- You need to use
[FromBody]to get it fired - You have to be able to look at the request and determine if and how to handle the content
So in this case for ‘raw content’ I want to look at requests that have the following content type:
- application/octet-stream (byte[])
You can add others to this list or check other headers to figure out if you want to handle the input, but you need to be clear about what content types you want to take. Remember that the input formatters hook into the request processing pipeline, so they are applied for all incoming requests. You must specify one or more particular content types for a given input formatter to allow it to work only with a selected type of content and to leave the other types untouched.
To create a formatter, you either implement IInputFormatter or inherit from InputFormatter. The latter is usually the better approach. We will enlist the supported media types in a Dictionary, associating them with a function processing the corresponding media type. With this approach, the biggest part of the code will be reusable so that we can extract them to an abstract FormatterBase class, and we can focus only on the actual implementation in our BinaryRequestBodyFormatter class:
Formatters/BaseFormatter.cs
using Microsoft.AspNetCore.Mvc.Formatters;
using Microsoft.Net.Http.Headers;

namespace OCR.Demo.API.Formatters;

public abstract class FormatterBase<TResult>: InputFormatter
{
    private readonly IDictionary<string, Func<HttpRequest, CancellationToken, Task<TResult>>> _converters;

    protected FormatterBase(IDictionary<string, Func<HttpRequest, CancellationToken, Task<TResult>>> converters)
    {
        _converters = converters;
        foreach (string mediaType in _converters.Keys.Where(type => !string.IsNullOrEmpty(type)))
        {
            SupportedMediaTypes.Add(new MediaTypeHeaderValue(mediaType));
        }
    }
    public override bool CanRead(InputFormatterContext context)
    {
        if (context == null) throw new ArgumentNullException(nameof(context));

        var contentType = GetContentType(context.HttpContext.Request);
        return _converters.ContainsKey(contentType);
    }

    public override async Task<InputFormatterResult> ReadRequestBodyAsync(InputFormatterContext context)
    {
        var request = context.HttpContext.Request;
        var contentType = GetContentType(context.HttpContext.Request);

        if (_converters.TryGetValue(contentType, out var readBody))
        {
            var content = await readBody(request, CancellationToken.None);
            if (content != null)
            {
                return InputFormatterResult.Success(content);
            }
        }
        return InputFormatterResult.Failure();
    }

    private static string GetContentType(HttpRequest request)
        => request.ContentType ?? string.Empty;
}
The formatter uses CanRead() to check requests for content types to support and then the ReadRequestBodyAsync() to read and deserialize the content into the result type that should be returned in the parameter of the controller method. CanRead is determined based on searching the _converters dictionary for the content type specified in the current request. The ReadRequestBodyAsync function picks the conversion method associated with the actual Content-Type and uses it to interpret the request body regarding the given media type. If the interpreter returns a null value, the content is treated as invalid.
Formatters/BinaryRequestBodyFormatter.cs
namespace OCR.Demo.API.Formatters;

public class BinaryRequestBodyFormatter : FormatterBase<byte[]>
{
    private static readonly Dictionary<string, Func<HttpRequest, CancellationToken, Task<byte[]>>> _converters
        = new()
        {
            { "application/octet-stream", ReadBinaryRequest }
        };

    public BinaryRequestBodyFormatter()
        : base(_converters)
    {
    }

    private static async Task<byte[]> ReadBinaryRequest(HttpRequest request, CancellationToken token)
    {
        var memory = new MemoryStream();
        await request.Body.CopyToAsync(memory, token);
        return memory.ToArray();
    }
}
Notes:
- As you can see, the formatter-specific implementation is done in the
FormatterBaseclass and is hidden from the actual formatter classes. The conversion logic is imported from the controller, and only the media type to implementation association is added to our new formatter. - Passing the whole
HttpRequestinstance to the conversion function allows the implementation to access the request body and other properties of the request — e.g., the request headers. It will be convenient in the following chapters. - This approach may seem to have a severe drawback: the Content-Type header must always be specified in the
HttpRequest. Fortunately, this does not affect us. If you look at the code of theFormatterBaseclass, you can see in theGetContentTypefunction that if the Content-Type header is missing, it is detected as an empty string. This allows us to assign a specific function to the empty string in the Media Type dictionary, thus defining a default in case theContent-Typeheader was not specified in the request. For example, you could declare the same implementation on the lack of the Content-Type header by specifying the following values in the_convertersdictionary:
{
    { "", ReadBytesFromRequest },
    { "application/octet-stream", ReadBytesFromRequest }
}
Add the formatter to the request pipeline
The InputFormatter has to be registered in the AddControllers method configuration section in the ConfigureServices() startup code:
Startup.cs / ConfigureServices() -- fragment:
services.AddControllers(options =>
{
    options.InputFormatters.Insert(0, new BinaryRequestBodyFormatter());
});
Notice that the custom formatter is inserted at the beginning of the list. This overrides the default formatter for the same media type if one already exists in the list. The framework will work with the first formatter that can handle the given media type.
Align our controller to utilize the custom formatter
With the formatter hooked up to the formatter list, you can now handle requests that POST or PUT to the server using an application/octet-stream. So we can return to our good old signature where the controller method receives a byte array.
Controllers/ImageController.cs (fragment)
[HttpPost]
public async Task<IActionResult> UploadImage([FromBody]byte[] image)
{
    var imageId = await _mediator.Send(new UploadImageRequest(image));
    return Ok(imageId);
}
We can POST our request as earlier — however, please remember to specify a Content-Type header with application/octet-stream value –, and the endpoint is working as expected.

Terrific, isn’t it?
Do you feel like giving it another spin? Then stay with me in the next chapter!
Dealing with multiple input format
With this innovation, you can recognize that the “application/octet-stream” media type is also available through Swagger UI.
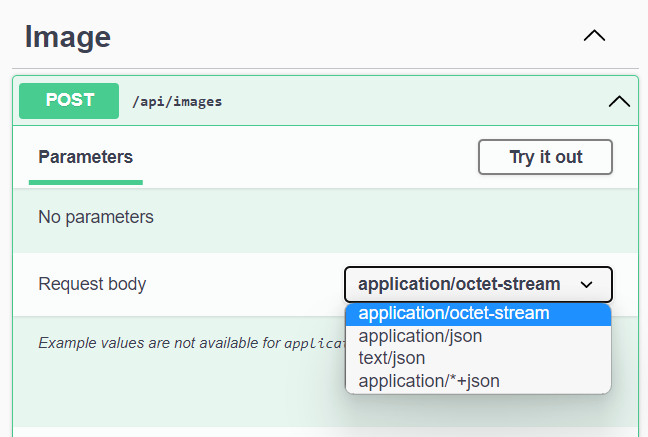
So from now, we can test our API by uploading binary files as we can do it by Postman. Great!
But could we also specify the content in the form of Base64-encoded text? Yes, we can, but we need to distinguish encoded content from other plain text content. Unfortunately, we have to do this without reading the text itself because the request body can be read only once, and we shall leave it untouched if our formatter won’t deal with it. (I.e., the CanRead() method must not have any side effect!).
We have three options to resolve this problem:
- introducing a new media subtype for Base-64 encoded text streams (e.g.
text/x-base64orapplication/x-base64) - mark the Base-64 encoded text streams as ‘
application/octet-stream‘ and let our custom formatter recognize and interpret them. - mark the Base-64 encoded text streams as ‘
application/octet-stream‘ and inform the API explicitly that the encoding type is Base-64
Honestly, no matter how “low-hanging fruit” the first option is, arbitrarily introducing a new, non-standard media type is something from the devil! The 2nd option may need too complex implementation. However, the last one seems promising, especially when we would extend it to other content types like image/jpg or application/gzip.
Providing the encoding type explicitly
There are two ways to provide an encoding type for an HTTP request. The most obvious way to use the Content-Transfer-Encoding header field. The following values are interesting to us:
Content-Transfer-Encoding: base64
Content-Transfer-Encoding: binary
Another option to provide an encoding type is to provide a parameter in the Content-Type header field. This option is widely used with payloads of text/plain type when the character set is specified as a charset parameter in the header field (e.g., Content-Type: text/plain; charset=UTF-8). With this syntax, we also can add encoding information for our binary content:
Content-Type: application/octet-stream
Content-Type: application/octet-stream; encoding=binary
Content-Type: application/octet-stream; encoding=base64
The first two options — with encoding=binary or without the encoding parameter at all — would represent the same format: the request’s payload is a raw binary stream. The last could represent the case when the binary content is encoded in Base-64 format.
Let’s implement both syntaxes with the first (explicit Content-Transfer-Encoding header) taking precedence over the second (encoding parameter in the Content-Type header field).
We need to update our FormatterBase class. Let’s make the GetContentType function protected (also available for the derived classes) and provide only the type/subtype part from the field (the values before the first semicolon ‘;‘.
Formatters/FormatterBase.cs (fragment):
protected static string GetContentType(HttpRequest request)
{
    var fieldValue = request.ContentType ?? string.Empty;
    return fieldValue.Split(';')[0];
}
We would also add a new protected function to get the Content-Transfer-Encoding header field:
Formatters/FormatterBase.cs (fragment):
[GeneratedRegex(@"^(?<type>[-\w.]+)/(?<subtype>[-\w.+]+)(;\s+(?<parameters>(?<name>\w+)=(?<value>[^;]+)))*$")]
private static partial Regex ParseContentTypeRegex();

protected static string GetContentTransferEncoding(HttpRequest request)
{
    var value = request.Headers["Content-Transfer-Encoding"].FirstOrDefault();
    if (!string.IsNullOrEmpty(value))
    {
        return value;
    }

    value = request.ContentType;
    if (string.IsNullOrEmpty(value))
    {
        return string.Empty;
    }

    var matches = ParseContentTypeRegex().Match(value);
    if (!matches.Success)
    {
        return string.Empty;
    }

    var parameters = ToDictionary(matches, "name", "value");
    return parameters.TryGetValue("encoding", out var encoding)
        ? encoding : string.Empty;
}

private static Dictionary<string, string> ToDictionary(Match matches, string keyName, string valueName)
{
    var names = matches.Groups[keyName].Captures.ToArray();
    var values = matches.Groups[valueName].Captures.ToArray();
    return names.Zip(values)
        .ToDictionary(item => item.First.Value, item => item.Second.Value, StringComparer.InvariantCultureIgnoreCase);
}
The tricky part is the regular expression at the front of the code above. Beyond that, it matches all forms of the Content-Type header (even if it has multiple parameters or no parameters at all), and it returns the parameters as value collections in two named groups: name and value. Then we create a dictionary from the two collections and return the value associated with the key of “encoding” (if it exists).
Note: With the regular expression above, we can also access other parameters in the
Content-Typeheader field and thetypeandsubtypesections in it through the corresponding named groups.
Reading and decoding Base-64 content
Now we can inspect the encoding value before we actually read the request body. I left the ReadBinaryRequest function unchanged and rather introduced a higher-level ReadBinaryContent function reading the content encoding from the request headers and then using the good old ReadBinaryRequest function to deal with raw binary contents or a new ReadBase64Request function to deal with Base-64 encoded streams.
Our updated formatter could be as follows:
Formatters/BinaryRequestBodyFormatter.cs (fragment):
private static readonly Dictionary<string, Func<HttpRequest, CancellationToken, Task<byte[]>>> _converters
    = new()
    {
        { "application/octet-stream", ReadBinaryContent }
    };

public BinaryRequestBodyFormatter()
    : base(_converters)
{
}

private static async Task<byte[]> ReadBinaryContent(HttpRequest request, CancellationToken token)
{
    var encoding = GetContentTransferEncoding(request);
    switch (encoding.ToLowerInvariant())
    {
        case "":
        case "binary":
            return await ReadBinaryRequest(request.Body, token);
        case "base64":
            return await ReadBase64Request(request.Body, token);
        default:
            throw new NotSupportedException($"Content-Transfer-Encoding: {encoding} is not supported");
    }
}
The naive implementation of the ReadBase64Request could be the next: read the binary content from the request body, cast it to a string, then decode the resulting Base-64 string to get the byte array it represents:
private static async Task<byte[]> ReadBase64Request(Stream requestBody, CancellationToken token)
{
    var content = await ReadBinaryRequest(requestBody, token);
    var base64string = Encoding.UTF8.GetString(content);
    return Convert.FromBase64String(base64string);
}
There are only two problems with this code.
- The last line will only succeed if the string length is divisible by 4. We should append ‘=’ characters to the base64 input to ensure that the string length is multiple of 4. We will deal with this issue later.
- The bigger problem is performance related. We read the entire input stream into memory, and we also create a string version of it. The decoding result is definitely needed in memory, but allocating twice the size of the given Base-64 data stream is unnecessary waste. Therefore, I have developed an “in-place-decoder” version for the ReadBase64Request function. It allocates memory only for the decoded stream and a static internal buffer of 4K. This buffer is used for reading chunks from the request body.
So the improved version of the ReadBase64Request function could be the next one:
Formatters/BinaryRequestBodyFormatter.cs (fragment):
private static async Task<byte[]> ReadBase64Request(Stream requestBody, CancellationToken token)
{
    var decodedStream = new MemoryStream();

    var bytesRead = await ReadBase64BytesAsync(requestBody, token);
    while (bytesRead.Length > 0)
    {
        decodedStream.Write(bytesRead, 0, bytesRead.Length);
        bytesRead = await ReadBase64BytesAsync(requestBody, token);
    }
    return decodedStream.ToArray();
}

private static readonly byte[] _internalbuffer = new byte[4096];
private static readonly object _lockBuffer = new();

private static async Task<byte[]> ReadBase64BytesAsync(Stream stream, CancellationToken cancellationToken)
{
    string encodedString;

    Monitor.Enter(_lockBuffer);
    try
    {
        var bytesRead = await stream.ReadAsync(_internalbuffer, 0, _internalbuffer.Length, cancellationToken);
        if (bytesRead == 0)
        {
            return Array.Empty<byte>();
        }

        while (bytesRead < _internalbuffer.Length && (bytesRead & 0x03) != 0) // i.e. while(bytesRead %4 != 0)
        {
            _internalbuffer[bytesRead++] = (byte)'=';
        }

        encodedString = Encoding.ASCII.GetString(_internalbuffer, 0, bytesRead);
    }
    finally
    {
        Monitor.Exit(_lockBuffer);
    }

    return Convert.FromBase64String(encodedString);
}
Do you remember the padding issue previously? Lines 30-33 in the source code above will solve this issue.
The only tricky part here is the use of the Monitor object. Why do we need it, and why do we use it instead of a simple lock statement?
The second question can be quickly answered. The monitored section contains an await-ed ReadAsync call; a must when we read from an HttpRequest body. (Remember, an HttpRequest body can only be read asynchronously.) However, the lock statement would cause a syntax error here, saying that an await is invalid in a locked section. This is why the lock statement is replaced by a “try..finally” block protected by the Monitor object.
The more interesting question is, why do we need a critical section here (a code section can be executed exclusively)? This is because we have only one buffer instance for reading chunks from the request body. If two requests are received simultaneously, they could collide without ensuring this exclusivity, i.e., the internal buffer could be corrupted by the second request while the first request still uses it. The solution is to create a “Critical Section” around the block of code that uses the internal buffer, allowing only one thread to access it at a time.
Notifying Swagger about the parameters in the Content-Type header field
The only task remaining is to enforce that the encoding=base64 parameter can be selected on the Swagger UI. We can do it simply by decorating the UploadImage endpoint in our ImageController with a Consumes attribute.
Controllers/ImageController.cs
[HttpPost]
[Consumes(
    "application/octet-stream",
    "application/octet-stream; encoding=base64"
)]
public async Task<IActionResult> UploadImage([FromBody]byte[] image)
{
    var imageId = await _mediator.Send(new UploadImageRequest(image));
    return Ok(imageId);
}
The first will ensure that we upload binary files using the Swagger UI. The second allows us to enter binary data as Base-64 encoded text through a text field on the Swagger UI.
Conclusion
POST requests with raw binary data in their body can challenge Swagger and us. Traditionally, they cannot be received as a function parameter at our endpoint implementations; the function shall read them directly from the request body. Fortunately, this restriction can be circumvented by using custom formatters. Beyond that, they are simple converters, they also can transform input data from different formats to a common representation to ensure that the endpoint implementations should not care about the data representation. This conversion can also be controlled by header fields provided by the request header. We could see how a single endpoint implementation could receive data represented by multiple formats: e.g., raw binary data stream, Base-64 text, compressed or uncompressed format, etc.
Articles you may also like
- CQRS and MediatR in ASP.NET Core (Code Maze, 09/30/2022)
- How to implement Mediator pattern in an ASP.NET Web API (Gwergilius.hu, 21/01/2023)
- Use the Azure Storage Emulator for development (Microsoft Learn, 11/08/2022)
- Testing an API with Postman (CircleCi Blog, 09/23/2022)
- Custom Formatters in ASP.NET Core Web API (Microsoft Learn, 06/03/2022)
- Accepting Raw Request Body Content in ASP.NET Core API Controllers (Rick Strahl, 09/14/2017)
- Content-Encoding Header Field (Mozilla Developer Network, Web Docs)
- Content-Transfer-Encoding Header Field (W3C, Protocols, RFC 1341)
- Cricital Section (Wikipedia, 27/12/2022)